A long time ago, my mother told me that my granny (her mother) loved colors like lavenders, greens, and yellows. I bought fabrics with an intention of making her a pretty pillow, but never really got around to it (no confidence). Well, one day I was perusing some of my older yarn and realized I had a beautiful lavender yarn with a matching multi-color. A trip to the yarn store netted me some lovely yellow and teal to match.
Well, now I need a plan. I was still stuck on the pillow because pillows can be held, caressed, and held close. While trying to decide, I noticed a pattern in an old 1980 crochet magazine I had where the center looked like hearts. But, I couldn't use the pattern because it was very dated looking, and for a bedspread.
I'll design a pattern myself, I said!
Famous last words, the insecure side said.
 So, after tucking the insecure bit of myself aside into a wooden box with a lock, I set out to find hearts. I find a very lovely granny-style heart at the Cherry Heart website. It's beautiful! She used it to make a bunting, but I saw it as the middle of my pillow. It was so easy to follow, and before I knew it, I had my center!
It's funny, I didn't realize that Cherry Heart had written the pattern in UK terms, and followed them like they were US terms. That made the hearts much bigger than the pattern specified, which turned out to be perfect! After I stitched the hearts together at the picots, I set out to create a "frame" with some not-very-complicated stitch-work. I can't tell you how many times I ripped out entire rounds, but I finally had a 12" square.
So, after tucking the insecure bit of myself aside into a wooden box with a lock, I set out to find hearts. I find a very lovely granny-style heart at the Cherry Heart website. It's beautiful! She used it to make a bunting, but I saw it as the middle of my pillow. It was so easy to follow, and before I knew it, I had my center!
It's funny, I didn't realize that Cherry Heart had written the pattern in UK terms, and followed them like they were US terms. That made the hearts much bigger than the pattern specified, which turned out to be perfect! After I stitched the hearts together at the picots, I set out to create a "frame" with some not-very-complicated stitch-work. I can't tell you how many times I ripped out entire rounds, but I finally had a 12" square.
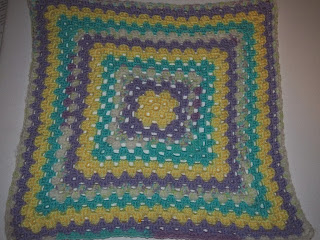 So, I got a burr in my saddle for a giant granny square on the back, and simply created one of those. As is true of all my "big" crochet attempts, it's wavy and out-of-whack, but relatively square. I am a self-taught crocheter, inspired by my grandmother (father's mother), so I am undoubtedly doing something wrong, but it still gave me what I wanted.
Don't you just love these colors? I don't have the sleeves anymore, but it was a baby-weight yard (a 3, for those who buy yarn), so it's very very soft and cuddly. I did learn something important with this yarn, though. Not all size 3's are made the same. The yellow is significantly "heavier" and created issues. I'm still glad I used it because it adds the "pop" I wanted, but next time I'll be more clued in.
So, I got a burr in my saddle for a giant granny square on the back, and simply created one of those. As is true of all my "big" crochet attempts, it's wavy and out-of-whack, but relatively square. I am a self-taught crocheter, inspired by my grandmother (father's mother), so I am undoubtedly doing something wrong, but it still gave me what I wanted.
Don't you just love these colors? I don't have the sleeves anymore, but it was a baby-weight yard (a 3, for those who buy yarn), so it's very very soft and cuddly. I did learn something important with this yarn, though. Not all size 3's are made the same. The yellow is significantly "heavier" and created issues. I'm still glad I used it because it adds the "pop" I wanted, but next time I'll be more clued in.
 Armed with a 40% off coupon to Joann's Fabrics, I bought a 12" pillow form. But when I got home, I decided that I wanted to cover it with a pillow case that could be removed and washed. So, back to the store I went, with another coupon, and picked up a very pretty, very soft color lavender fabric with sparkles! I love sparkles! I hope you can see the sparkles in this fabric. It's really subtle. It's perfect.

So, time to make a pillow case! That meant it was time to pull out the sewing machine and get moving. I haven't used my machine since before we moved, which was more than a year. Yeah, I know. Shameful! Oh, and of course, Ryan had to check out my work. He's so silly. He's my bud.
I found a tutorial online for making pillows, and thought I'd take pictures of each step, but I've decided not to post them. It's pretty straightforward, so that set of pictures would just be too much! I did think I wanted to serge the pillow to fix the raw edges, but I found my serger in quite the state, and two hours later it still wasn't working correctly.
So, the left picture above was the threading (yikes!) and the right picture is how to thread it. I tried, I really did, but it was pulling in all sorts of strange ways, so I put it back in the closet and used my regular machine and my pinking blade (that I finally did find, yay!) to "finish" the raw edges of the pillow.
I decided on a soft scallop on the pillow edges, and used something I found in a book which, interestingly enough, turned out to be the same pattern as what I used for my mom's hoop! Same pattern, same stitch count, and everything. Works for me! The only picture I have of the crocheted pieces is below when I set up to make the pillow case. Not a great picture, but it's something.
 I left one side of the pillow open to be able to stuff the covered pillow inside. That meant adding buttons to that side as well. Praise God I had the *perfect* wee buttons for the task! So, I sewed them to the back of the pillow, on the outside, and simply used the tiny hole made by the scallop as the "button hole". It seems to work well, but may fail if stressed. Hopefully, it won't be stressed. :)
Can you see the tiny buttons? They were the perfect size plus they were post buttons. I didn't have to run out to buy a thing. I love it when that happens.
So, this is my final product. Forgive the background. I put the table away that I was sewing on, and don't feel good enough to set it back up for one picture. I threw an old white comforter on my ancient rocker and called it a backdrop!
There are certainly things I'd do differently should I do it again. And the insecure side of me attacked so often, that it took me nearly 6 months start to finish to complete this. But, I'm happy with it as my first "made by Kimberly" type of project.
This is for my granny. I love her so much, and she's been through quite a lot, especially lately as she's now wheel-chair bound. But, I have many good memories of her and her home -- the chocolate pudding cooling on the top of the chest freezer, the Siamese cat who came and went, the salmon patties she'd cook when we were hungry, watching her pat out her biscuits into a cast-iron skillet before tucking them into the oven, the warmth of the kitchen.
So, this was my act of love for her. It's not much, but when I think of how much love she showed us, I feel happy and warm inside. My gesture is small. I sincerely pray that she loves this pillow.
And I can't complete this post without giving a TON of credit to the LORD. I made the hearts wrong, but they turned out perfect. He pointed me to yarns that matched perfectly to these years and years old yarns. He pointed me to the fabric, when I'd given up. He revealed the buttons to me, which were at the very bottom of a button pile I'd decided not to go through. I just really feel His blessing all over this pillow, and I pray that it brings my granny sweet, happy feelings.
Anyway, thank you for reading!
Blessings,
Kimberly
I left one side of the pillow open to be able to stuff the covered pillow inside. That meant adding buttons to that side as well. Praise God I had the *perfect* wee buttons for the task! So, I sewed them to the back of the pillow, on the outside, and simply used the tiny hole made by the scallop as the "button hole". It seems to work well, but may fail if stressed. Hopefully, it won't be stressed. :)
Can you see the tiny buttons? They were the perfect size plus they were post buttons. I didn't have to run out to buy a thing. I love it when that happens.
So, this is my final product. Forgive the background. I put the table away that I was sewing on, and don't feel good enough to set it back up for one picture. I threw an old white comforter on my ancient rocker and called it a backdrop!
There are certainly things I'd do differently should I do it again. And the insecure side of me attacked so often, that it took me nearly 6 months start to finish to complete this. But, I'm happy with it as my first "made by Kimberly" type of project.
This is for my granny. I love her so much, and she's been through quite a lot, especially lately as she's now wheel-chair bound. But, I have many good memories of her and her home -- the chocolate pudding cooling on the top of the chest freezer, the Siamese cat who came and went, the salmon patties she'd cook when we were hungry, watching her pat out her biscuits into a cast-iron skillet before tucking them into the oven, the warmth of the kitchen.
So, this was my act of love for her. It's not much, but when I think of how much love she showed us, I feel happy and warm inside. My gesture is small. I sincerely pray that she loves this pillow.
And I can't complete this post without giving a TON of credit to the LORD. I made the hearts wrong, but they turned out perfect. He pointed me to yarns that matched perfectly to these years and years old yarns. He pointed me to the fabric, when I'd given up. He revealed the buttons to me, which were at the very bottom of a button pile I'd decided not to go through. I just really feel His blessing all over this pillow, and I pray that it brings my granny sweet, happy feelings.
Anyway, thank you for reading!
Blessings,
Kimberly
I love to craft. I just love taking something generic like yarn, or paper, or fabric and manipulating it to create something lovely. It just makes me feel so good to sit back and look at my creation and say, "I did that!"
So, I'm going to share a crochet project that is also a Christmas present, and the only reason I'm sharing is because she doesn't have internet. :) So, for those who can guess the recipient, mum's the word!
One of my favorite blog websites is a creative being. Why? Because her beautiful patterns instilled in me a love for mandalas.
 Well, one day I was puttering about her blog when I ran across a lovely mandala pattern she'd put on the tuts+ website. More specifically, the mandala found here.
When I saw the mandala, I saw "sunflower". And, to make it all that much better, I had yarn in lovely greens, yellows, and a brown already in my possession!
Which is both good and bad, if you think about it. It's good because I don't need to go shopping. It's bad because I don't get to go shopping. If you love yarn, you'll understand what I mean. :D
So, I decided on a pattern for the colors, and set out to make the mandala. And here it is!
Sorry for the cattywampus picture! I'm not a master of "pictures for a blog" yet. That's one my reading to-do list, which is somewhat long.
Basically, I simply made the mandala from the tutorial. It was very straightforward to follow, which made crocheting it a breeze. I used the Caron One Pound yarn in a deep yellow (Sunflower), brown, and two versions of green. I've mislaid the sleeves, so not sure of the two greens. One was Soft Sage, but I couldn't tell you if that was the dark green or light.
If I remember right, I used the I hook (5.5mm), which was recommended for the yarn.
When I finished the mandala, I thought, "that would be really pretty inside an embroidery hoop." Much to my delight, it fit exactly inside a 12 inch hoop. Following the instructions at Sew Chatty, I crocheted around the outer part of the hoop, creating the lovely scallop pattern.
I then wrapped the inner piece of the hoop with some yellow ribbon. I tied the mandala in place using fishing line (60lb, I believe), hot glued the knots in place, then hot glued rick-rack on top of the knots.
This caused a small problem. :( I couldn't get the inner hoop inside the outer one without removing the screw. And the thought of tearing that all apart was too much for my poor, tired brain. So, I left off the screw, tied it together with fishing line, then made a bow to disguise the goof.
I think I like it anyway. :) Though, I will do something different next time. That is, if there is a next time! Haha. Who am I kidding? I've already made three other mandalas from a different pattern. I'll try new things with those! They are also made with these colors, but are much smaller. I'll have to finish them up so I can post them as well.
Something about finished yarn projects just makes me want to run my hands over them again and again. It's the yarn just beautiful? I have more than I need, I'm sure. But I can find uses for them! In fact, the brown is currently being use to make a crochet "cat". We'll see where that goes. :)
I'm glad today is through with torturing me.
I woke up to discover that the fan on my computer had stopped working again. I opened the case and pushed it back into place (it's loose), and it worked ... for 30 minutes. /sigh Ben says I have enough fans (I have 5), so I'm not opening that stupid case again. It's not hard, just aggravating.
I went Christmas shopping, but someone's child in the store was making a noise that drove me crazy (odd stuff, that). I'm not feeling 100%, but not sure what's wrong, so I guess that's why I couldn't handle the sound. So, I left without finishing. I get to panic next week about it all.
I don't know if it's the rain, or the season, or what, but the number of people on the road phone-distracted is higher than usual. I lost my mind behind one fellow who was driving with one foot on the brake. He pulled such a dumb maneuver that I was forced to pass my usual turn to the house and go down to the next one.
I also completely forgot that Rachel has Cookies & Cocoa with David from VFC today, and the minute I walked in the house, Rachel said, "we are only 1 minute late, so it's okay." To make matters worse, I racked my brains trying to remember his address, and drew a great, big blank. I had to call to ask, which made me feel bad since the event had already begun.
I then decided I'd go to the pharmacy to get my prep for a procedure I'm having done this week (a colonoscopy). I thought (yeah, brilliant) that I'd drive there while Rachel was at her party. It took me 40 minutes to get to the pharmacy and back to get Rachel. I barely made it on time to retrieve her. To complete the frustration, they didn't have my prescription. Apparently, the office forgot to call it in. They were apologetic, but it wasn't their fault.
And the final blah of the night -- I was showing hubby something I bought for Miss Mary for Christmas, and when I set it back on the shelf in the display cabinet, the shelf gave way (it's glass), landed on the shelf below dislodging it (it's also glass), and every bit of that stuff came down on top of my left foot (it's not glass, but it's hurting). The thing I bought shattered, and we also lost a plate that Rachel painted 3 years ago. So, now I'm limping and heart broken.
So, that was my day. I share it so perhaps you can feel better about yours. :)
But despite all that, and as frustrating as it all was, I heard the LORD speak to my heart. He was loud and clear.
He said, "you are busying yourself with things I've not called you to do. Let them go."
I then had ideas pop into my head of things I can do that don't require frantic shopping, or running about, or anything of the sort. Things I can do that are easy on me, on my family, and on my well-being.
Which begs the real question -- why didn't I know about them before now? Well, I guess that's the real lesson. Maybe less rush-rush-rush and more being still. Tragically, that's my greatest problem -- getting still. I'm self-distracting.
Sadly, I can't share my ideas cause those who will benefit can read this. :) I'll have to revisit this perhaps at some future date.
Psalm 46:10 NASB
"Cease striving and know that I am God;
I will be exalted among the nations, I will be exalted in the earth."
Blessings,
Kimberly
Welcome to my new blog! If you are looking for someone who is chaotic, disorganized, and generally lost, you are in the right place! If you want order and neatness, well ... you are gonna need to move on. My brand of chaos may make you cringe. :)
So, I'm new to blogging, which means that the format of this blog will probably change radically over time as I borrow ideas from smarter bloggers than myself. Besides, it'll be easier to rearrange this blog than to rearrange my bedroom.
I love to craft, so it makes sense to me to start by sharing a recent craft project for which I have pictures.
I found a project in the magazine "Quilts and more" from Winter 2012 for a No-Sew Wreath. I liked it, but didn't move to make one until similar wreaths started popping up on Pinterest.
Now, if you've never been on Pinterest ... Wait, is that even *possible*?? Honestly, Pinterest is flatly addictive. I can't figure out why, but it is. Don't go there. Really. If you go, you don't get to blame me. :) I warned you. >.>
So, the wreath is all over Pinterest, and my magazine, so I figured I'd give it a go for fall. A visit to Hobby Lobby at the end of October netted me a pack of brown fat eighths, a pack of orange fat eighths, and a pack of red and orange fat quarters.
Wow, eighth is one weird looking word.
Instructions are something like this: cut all the fabric into strips (the magazine suggested 1/2inch by 5inches), tie them onto a wire wreath form, and enjoy. It is suggested to use pinking shears to cut the strips so they don't unravel.
Reality is more like this:
1. Discover that finding a pinking blade for my rotary cutter ain't gonna happen, so hand cut all that fabric with 30 year old pinking shears.
2. Well, 30 year old pinking shears hand out blisters, so only cut a little at a time, mainly while sitting in a parking spot in downtown waiting for a child to get off work. Reward is a lap full of fabric bits.
3. After 3 weeks of cutting, decide that measuring is for "the birds" and "eyeballing it" is okay.
4. Once all the strips are cut, throw them around the floor in some strange celebration that only fabric lovers can grasp. My husband is clearly not a fabric lover.
5. Pick up the wire wreath form to realize that it is a 14" circle with four lanes of traffic. Four. Wait, seriously, I gotta fill **4** channels.
6. Start tying. Realize you can't ignore the colors by grabbing fabric willy-nilly. Fight the urge to go OCD. Throw more fabric around.
7. Keep tying.
8. Celebrate when a channel is done. Do steps 6 and 7 three more times. I recommend tossing fabric bits from time to time to keep the family on their toes. I mean, after all, mom might be crazy so let's all "get along" with her.
9. Buy "The Avengers" so you can tie strips while being entertained. So. Much. Eye. Candy. Wow.
10. Finish final tie, fluff, stand back, and enjoy.
11. Give husband the stink eye when he says, "the colors are muddy from the road so you can't see all the colors used."
So, here's some pictures of the wreath I made.
I really thought it turned out pretty well, despite the fact that I ignored the suggestion of "always make sure the right side of the fabric is up". I got tired of that one pretty early on.
I also lucked out and found some fall-type picks in storage from 15 or so years ago, and put them in place around the wreath. Unfortunately, most of the picks were broken, so not much to choose from. (And I was feeling too cheap to go buy more.)
My husband said that the deep red pumpkin is the easiest to see from the road, so I kinda wish I'd had more. I really did enjoy making the wreath, although I almost gave up about 3 weeks in. The pinking shears weren't doing my right hand any favors.
 I thought I'd give you a little close up so you can see what to do better. In other words, don't be like me. :) Still, I really like it.
So, I triumphantly put the wreath on my front door on November 24th, almost 1 full month after buying the materials. And, to my dismay, my 16yo (who decorates our house for Christmas), took it down on November 30th.
6. Days.
Well, there's always next year! That is, if I can find it. This is what chaos looks like in our household.
Blessings,
Kimberly, the Joyful Mom
 So, after tucking the insecure bit of myself aside into a wooden box with a lock, I set out to find hearts. I find a very lovely granny-style heart at the Cherry Heart website. It's beautiful! She used it to make a bunting, but I saw it as the middle of my pillow. It was so easy to follow, and before I knew it, I had my center!
 So, I got a burr in my saddle for a giant granny square on the back, and simply created one of those. As is true of all my "big" crochet attempts, it's wavy and out-of-whack, but relatively square. I am a self-taught crocheter, inspired by my grandmother (father's mother), so I am undoubtedly doing something wrong, but it still gave me what I wanted.
  Armed with a 40% off coupon to Joann's Fabrics, I bought a 12" pillow form. But when I got home, I decided that I wanted to cover it with a pillow case that could be removed and washed. So, back to the store I went, with another coupon, and picked up a very pretty, very soft color lavender fabric with sparkles! I love sparkles! I hope you can see the sparkles in this fabric. It's really subtle. It's perfect.


 I left one side of the pillow open to be able to stuff the covered pillow inside. That meant adding buttons to that side as well. Praise God I had the *perfect* wee buttons for the task! So, I sewed them to the back of the pillow, on the outside, and simply used the tiny hole made by the scallop as the "button hole". It seems to work well, but may fail if stressed. Hopefully, it won't be stressed. :)


